Creating a Dota Map Image
 I figured out how to generate dota 2 map images using Source Filmmaker.
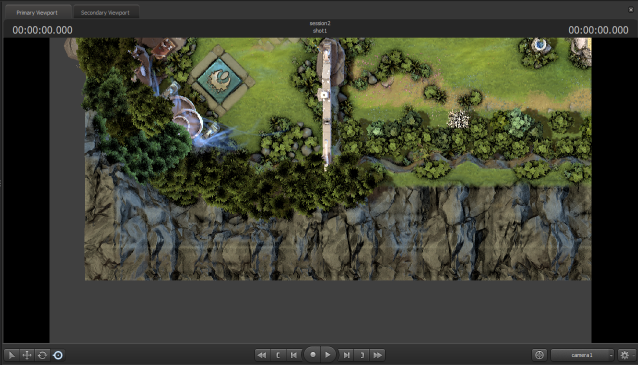
My original method for creating dota map images was stitching together screenshots I took in game. But the cl_leveloverview command I used to get the orthographic projection stopped working ever since the Dota 2 Reborn update. So for a period of time I wasn’t able to create new map images. Then one day Noxville sent me a map image created by MaxOfS2D which I was able to use in my interactive map. It was a good image and showed me that it was possible to use Source Filmmaker to create dota map images. After the latest map changes made that image outdated, I needed to figure out how to use SFM to create map images myself.
Dota Workshop Tools comes with SFM, so I just opened up a new custom game project and launched SFM from there. This was my first time using SFM so I had no idea what I was doing. But eventually I ended up with this SFM session file dotamap7.dmx
It’s basically a 45 second long movie with the camera panning over the dota map. It starts in the bottom left corner and ends up in the top right corner moving in a snake-like pattern. The camera distance is set to a very large value and the field of view is set to 1.
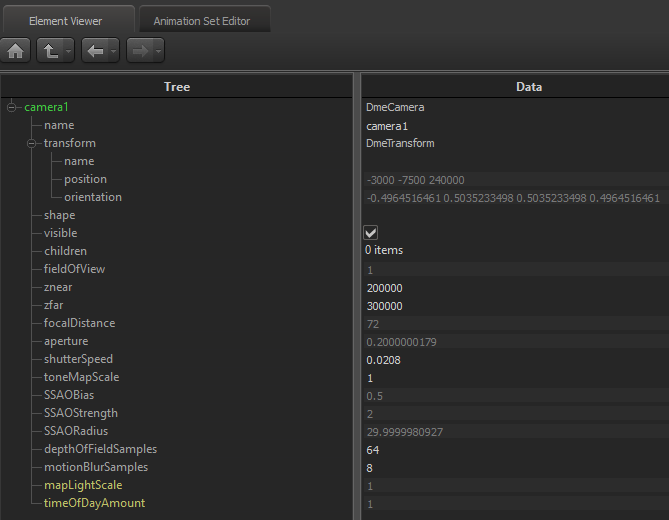
Here’s the camera prop values I set in the element viewer.
Here’s some views of the Graph Editor timeline which describe the movement of the camera.
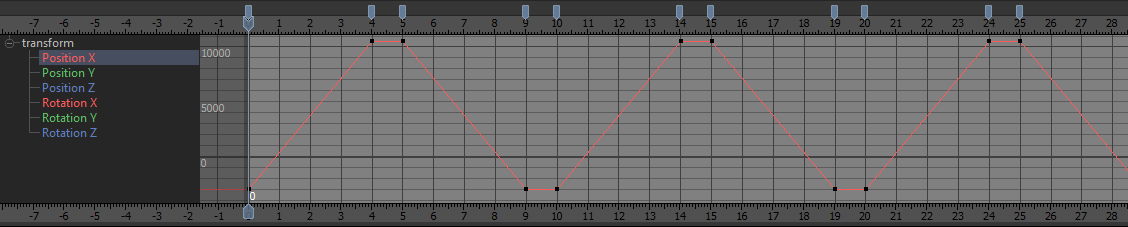
The camera X position goes from -3000 to 10500 over 5 seconds which represents one left to right sweep over the map.
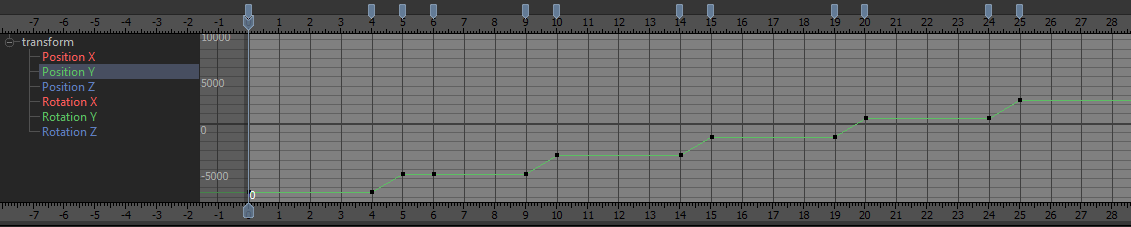
The Y position remains constant during this time. Then the X position stays constant for 1 second while the Y position increases. This sets up for the next row.
The X position then moves in the opposite direction from 10500 to -3000 over 5 seconds, which makes a right to left sweep over the map. Then the X position stays constant for another 1 second while the Y position goes up to start another row like before. This pattern is repeated until the whole map is covered.
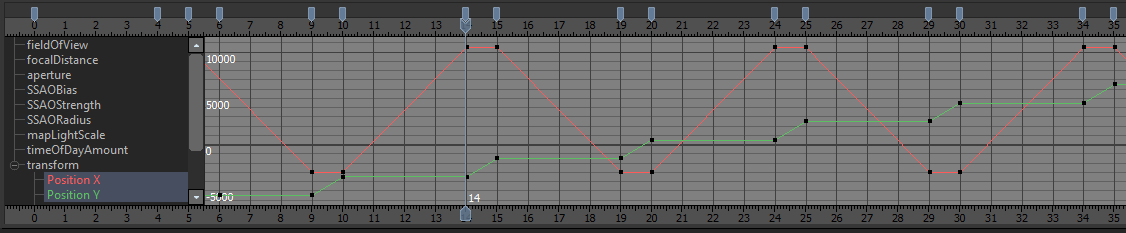
The Z position and XYZ rotation are constant.
Here’s an example movie demonstrating the camera movement.
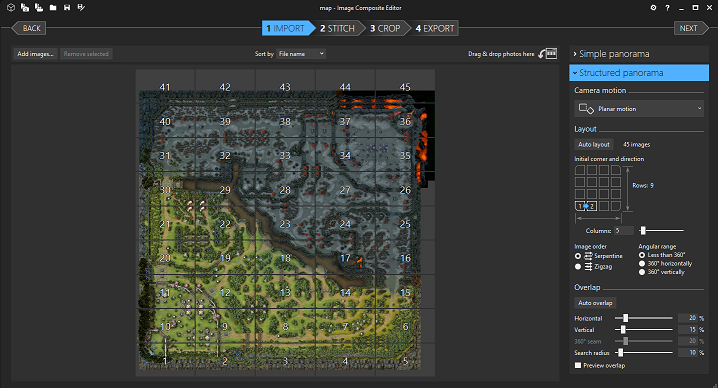
To get the images necessary to form the dota map image, the movie is exported as pngs with a resolution of 3840x2160 at 1 FPS. Since the camera movement is set to take 5 seconds for one horizontal pass over the map that results in 5 frames per row. There’s 9 rows so that’s 45 images in total which come together in a 5x9 grid to form a complete image of the dota map.
I stitch together the images using Microsoft’s free Image Compositor Editor
Mapping Image Coordinates to In-game Coordinates
Now that I have a dota map image, the next step to using it in my interactive map is to figure out how the pixel coordinates map to in-game coordinates.
To do this I start with two in-game coordinates and find the corresponding pixel coordinates on the map image. Then I get the ratio of the X component distance between the two in-game coordinates and the two map pixel coordinates. I do the same thing for the Y component. So now I have two scale factors that I can just multiply map pixel coordinates by to get the corresponding in-game coordinate.
Here’s a concrete example that I used for this latest map.
The two coordinates I’m going to use are:
- map origin (0,0)
- Radiant bottom right Tier 4 tower (-5389.603515625, -5216.4809570313)
I found the tower coordinate by just loading the map in Hammer and selecting the tower entity.
Then I got the corresponding pixel coordinates by just opening the image in Photoshop and moving my mouse over the right location and reading the x,y in the info window.
So the two coordinates on the map are:
- map origin (7800, 8280)
- Radiant bottom right Tier 4 tower (2840, 13064)
The X distance from origin to tower in-game is |-5389.603515625 - 0| = 5389.603515625 and in pixels it’s |2840 - 7800| = 4960. The ingame/image ratio is 5389.603515625/4960 = 1.08661361202
For my purposes I need to get what the bounds of the map image are in terms of in-game coordinates. My image is 16384x16384 so I need to figure out what (0,0), (0, 16384), (16384, 0), and (16384, 16384) correspond to in-game. I can do this using the map origin pixel coordinate (7800, 8280) and the scale factor of 5389.603515625/4960 = 1.08661361202 I just calculated.
The X distance from the map origin to the right boundary is |16384 - 7800| = 8584 pixels. Converting this to in-game coordinates is 8584 * 5389.603515625/4960 = 9327.49124559. So the corresponding in-game X coordinate of my image’s right boundary is 9327.49124559 units from the origin. Since the in-game map origin is (0, 0), then the right boundary is just 0 + 9327.49124559 = 9327.49124559.
The left boundary calculation is -7800 * 5389.603515625/4960 = -8475.58617377
So now I know that the X bounds on my image [0, 16384] map to [-8475.58617377, 9327.49124559] in-game.
Using the same method for the Y bounds I get [9028.52473332, -8836.61406266]. One thing to note is that the direction the Y component increases in the image pixel coordinate system is opposite the in-game coordinate system which is why the order is different. You can also see how this is accounted for in the coordinate conversion code used in my interactive map. Image to in-game and in-game to image
So the top left of the image (0, 0) in pixels is (-8475.58617377, 9028.52473332) in-game and bottom right in the image (16384, 16384) is (9327.49124559, -8836.61406266) in-game. You can see the values appearing in the code here
Creating Tiles
The last thing I need to do to make these images usable in my interactive map is split them into tiles.
I use ImageMagick to do the splitting. Here’s the batch script I made.
The first few lines just set up 5 folders numbered 0 to 5 and makes sure they’re empty. Then I start by converting the png I have to a lower quality jpg because I don’t want to be using a 350mb+ image. I scale down the images and pad them to some multiple of 256, because 256 is my tile size. The last few lines do the splitting. I need to tell ImageMagick to do everything on disk and I specify a specific hard drive and folder for it, because doing everything in memory didn’t work. Splitting the first and largest image takes over an hour, but it is a very large image and it has to use disk for everything.
And that’s it. That’s how I create a dota map image for my interactive map.